10 Tips for Transducer Placement
Today's fishing electronics are amazing pieces of equipment. With the ability to mark fish at 70 mph, look down and sideways for fish and use GP:S navigation to get us to our fishing spots, these units are changing the way we fish. One of the most often asked questions we get about electronics pertains to transducer mounting. If transducers are mounted properly, your sonar unit has the capability to produce high-quality 2D sonar readings at speeds up to 70 mph and StructureScan readings into the 30 mph range! Transducer placement and mounting is the MOST critical step to sonar performance, but is given the LEAST amount of attention by most boat owners. Taking the time and effort to get transducer placement correct is often ignored by most boat owners and marinas. Let's discuss a 10 tips for transducer mounting that will help you get the most from your sonar units.
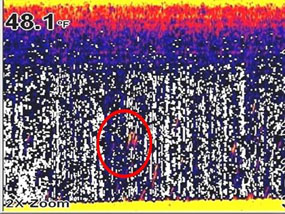
READING SONAR AT HIGH SPEEDS1) The biggest issue creating bad sonar readings, especially at high speeds, is air bubbles traveling under the transducer.
2) Most transducer are mounted TOO LOW in the water for high-speed readings. At high speed the top of the transducer should actually be above the water. We need a flow of clean water on the transducer bottom. A transducer placed too low in the water will cause water to flow over the top of the transducer creating a rooster tail and creating air bubbles that will travel over the bottom of the transducer.
3) Most transducers are mounted TOO FAR from the keel of the boat. Even a small boat with low horsepower runs on a very small piece of the hull when on plane. Placing a transducer outside of this small "pad" will result in poor, or in some cases no, sonar readings at high speeds.
4) A transducer placement, no matter who performs it, will NOT be perfect the first time! To get the best performance from your transducer installation the transducer must be installed, the boat ran, the transducer moved slightly and the boat ran to see the new results. Continue until you have the BEST installation location and height for your rig. Using a transducer mounting plate makes this easy to do.
5) Avoid mounting the transducer on the port side of the boat. Remember air bubbles caused by cavitation UNDER the transducer are a bad thing. Most props have a clockwise rotation, meaning that cavitation is ABOVE a transducer mounted on the starboard side, but the cavitation is forced UNDER a transducer on the port side, causing less than perfect readings.
VIEWING SONAR ON MULTIPLE UNITS6) On aluminum boats it is important to avoid placing the transducer directly behind strakes and rows of rivets that run parallel to the keel.
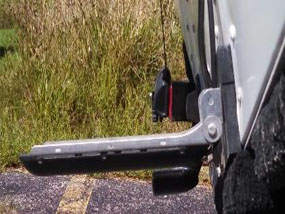
7) On fiberglass bass and walleye boats, high speed readings can be obtained by placing the transducer on the BOTTOM step, down where the livewell pickup and drains are located. Shoot through hull installations are about 60-70% as good as transom installs, especially for marking fish at high speeds.
8) Multiple transducers on the transom can create cavitation and interference issues. For best results, mount only the Lowrance Skimmer transducer and LSS on the transom. If you need to mount other transducers, pickups etc. use the port side of the boat, but remember, two different transducers "Pinging" at the same time will create issues on both sonar screens.
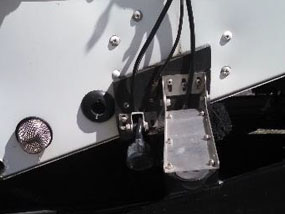
9) Your LSS transducer works best when located VERY CLOSE to the skimmer transducer. Some mount it higher than the skimmer, some lower, but being close is one of the keys to best performance of both 2D and StructureScan. Keep the transducer higher on the transom than you think. The seam at the middle of the skimmer transducer should be LEVEL or slightly ABOVE the bottom of the transom. Too low creates air bubbles. Today's sonar units are designed to read bottom and MARK FISH at speeds up to 70 mph! The key to ultimate sonar performance is transducer placement and mounting.
10) When mounting the transducer for the first time, run a transducer extension cable from the back of the sonar unit to the rear of the boat and plug the transducer into the extension. This way if you ever need to replace a transducer you will not need to run the transducer cable again, just simply install the transducer and plug into the extension cable! Saves time, effort and in most cases have to open the side of the boat to run the cable again.
Mounting a transducer properly takes some time, but with a little effort and these tips, your Lowrance unit will perform to the capabilities it is designed for, allowing you to see more fish, mark at high speed and catch more fish! For more articles covering the details of transducer installation, unit setup and more sonar/GPS tips and tricks and great fishing tips visit www.teachinfishin.com
CHECK OUT THE SONAR INTERPRETATION FEATURE COURSE